Do you want to connect your Arduino Board to the internet? Well you can,and even in a cheap and reliable way.You just have to use ESP8266 WiFi module with your Arduino. It is available for just 5$ or less than that. You can have your own ESP8266 module from the websites like Amazon and Ebay.
To buy ESP8266 from amazon, click here..
.
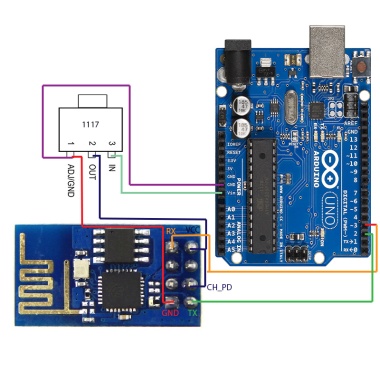
ESP8266 is a 3V device.It is just of 5$ but the power consumption is high.So we need to use 1 A current over here.For having the current of 1 A,we are using 1117 Voltage Regulator. In this tutorial,we will learn to send AT commands to ESP8266 . Connect the circuit as shown in figure. 
Paste the code in the Arduino Software.
 #include <SoftwareSerial.h>
 SoftwareSerial esp8266(2,3); // make RX Arduino line is pin 2, make TX Arduino line is pin 3.
                // This means that you need to connect the TX line from the esp to the Arduino's pin 2
                // and the RX line from the esp to the Arduino's pin 3
 void setup()
 {
  Serial.begin(9600);
  esp8266.begin(9600); // your esp's baud rate might be different
 }
 void loop()
 {
  if(esp8266.available()) // check if the esp is sending a message
  {
   while(esp8266.available())
   {
    // The esp has data so display its output to the serial window
    char c = esp8266.read(); // read the next character.
    Serial.write(c);
   }
  }
  if(Serial.available())
  {
   // the following delay is required because otherwise the arduino will read the first letter of the command but not the rest
   // In other words without the delay if you use AT+RST, for example, the Arduino will read the letter A send it, then read the rest and send it
   // but we want to send everything at the same time.
   delay(1000);
   String command="";
   while(Serial.available()) // read the command character by character
   {
     // read one character
    command+=(char)Serial.read();
   }
   esp8266.println(command); // send the read character to the esp8266
  }
 }
Now upload the code and open Serial Monitor. Send the AT command “AT+RST”,the response will be OK. Send “AT+CWLAP” to show the available networks around ESP8266. SEND “AT+CWJAP=”SSID”,”PASSWORD”” to connect to any particular network. then “AT+CIFSR” to see the i.p address. This way we can test our WiFi module and use it to connect it to the network. Thank You 🙂
Hello Abhishek,
I am facing problem with ESP8266 CLIENT programming. The problem is with AT+CIPSEND command, this command is responding nicely for few cycles, but after few cycles, it waits too long for SEND OK command. I have tested the code with the delay of 1second after each command to ESP through controller.
If I reset the microcontroller, I received send OK on terminal from ESP8266.
Can you suggest somthing to solve this issue.
LikeLiked by 1 person
Hey,Sharmila.I think adding the delay in between “At+CIPSEND” command might be the solution.and after resetting the microcontroller you are receiving “send ok”,so maybe clearing the buffer of microcontroller would be helpful too.
LikeLike
Hello, I realy dont know what should i do, i connected everything like you, and the esp comunicates a litle, it responds to AT and AT+GMR, but when i try to reset it i get an invalid… does anyone know how could i fix it?
A picture, if it helps: http://shrani.si/f/w/Ul/1nDPz6yA/untitled.jpg
LikeLike
Hi Zan,try to use it with baud rate of 9600
LikeLike
what’s esp8266 firmware you use?
LikeLike
I used arduino.
LikeLike
I’m receiving unknown characters like ÿÿÿþÿÿþþÿÿÿþþÿÿÿþÿÿþÿ when I try to type AT+CWJAP=”Izumi”,”einsteinn”
In fact, it reply me with these characters whatever the input is. Please help.
LikeLike
Hey Pyi,check the baud rate.Maybe that will help.Use 9600 at baud rate
LikeLike
Abhishek,
Hello, I have downloaded the last FW and flashed it into ESP8266.
I use 0.9.5 for ESP8266. Switching off/on I get vendor =…and V0.9.5, compiled Dec 2014.
Using different AT commands give the same response. I can see a ESP-A1-THINKER_9860D WIFI spot on my PC WIFI spot list.
How can I command ESP ?
Do I need ARDUINO ? ( ESP uP is much better than Arduino UNO, more RAM, faster)
Can I connect sensors directly to ESP ?
How can I readout values ?
Regards to incredible India,
Gerry
LikeLike
Hey Gerry,did not worked on ESP uP alone yet,let you know when I will work on that 🙂
LikeLike
Don’t you need to limit the voltage on the TX from the Arduino to the ESP8266? It’ll be at 5V.
LikeLike
It worked fine for me.But I would suggest you to limit the voltage.
LikeLike
I am getting espcomm failed and sync failed error
How do I fix it?
Please help me
LikeLike
2 Pingbacks
Recent Posts