Android ListView Tutorial — February 1, 2016

Android ListView Tutorial

Hey friends, in this post we will make an app using ListView .

When the app starts, a list displays the names of different animals. And whenever the name of the animal is clicked, its image is displayed in another activity.

1.Add Images in the res/drawable folder

You can download the images from google or by this link.

1

2. Create a Class  to store the names and images on Animals

We will add a new class named as Animals where all the information (names and image id of animals) would be stored.

This class is created to separate the information from the activities. Objects of this class would be used in the Activities. 

Let’s say the name of this class in Animals.java.

In this Activity, we will create two variable as Name and imageResourceId.

Make constructor of Animals class

Set getters

Remember to create the toString method as it will be used by the ArrayAdapter in the MainActivity to display the Name variable of the animal object.

The code of the Animals.java class is :-

package com.abhi.listview.listviewtutorial;

/**
 * Created by abhi on 2/1/2016.
 */
public class Animals {

    private String Name;
    private int imageResourceID;        //for image

    //constructor
    private Animals(String Name,int imageResourceID)
    {
        this.Name=Name;
        this.imageResourceID=imageResourceID;
    }

    //getters

    public String getName()
    {
        return Name;
    }

    public String toString()
    {
        return Name;
    }

    public int getImageResourceID()
    {
        return imageResourceID;
    }

    // creating objects of the class

    public static final Animals[] animals= {new Animals("Dog",R.drawable.dog),
                                             new Animals("Cat",R.drawable.cat),
                                            new Animals("Cow",R.drawable.cow)};


}


3. Create textView and ListView in the content_main.xml

The content_main.xml code would be as follows. Make sure to ID the ListView as it would be recalled in the MainActivity.java

<?xml version="1.0" encoding="utf-8"?>
<RelativeLayout xmlns:android="http://schemas.android.com/apk/res/android"
    xmlns:app="http://schemas.android.com/apk/res-auto"
    xmlns:tools="http://schemas.android.com/tools"
    android:layout_width="match_parent"
    android:layout_height="match_parent"
    android:paddingBottom="@dimen/activity_vertical_margin"
    android:paddingLeft="@dimen/activity_horizontal_margin"
    android:paddingRight="@dimen/activity_horizontal_margin"
    android:paddingTop="@dimen/activity_vertical_margin"
    app:layout_behavior="@string/appbar_scrolling_view_behavior"
    tools:context="com.abhi.listview.listviewtutorial.MainActivity"
    tools:showIn="@layout/activity_main">


    <TextView
        android:layout_width="wrap_content"
        android:layout_height="wrap_content"
        android:textAppearance="?android:attr/textAppearanceLarge"
        android:text="Animals"
        android:id="@+id/textView"
        android:textSize="@android:dimen/app_icon_size"
        android:textColor="@android:color/holo_blue_dark"
        android:layout_alignParentTop="true"
        android:layout_alignParentLeft="true"
        android:layout_alignParentStart="true" />

    <ListView
        android:layout_width="wrap_content"
        android:layout_height="wrap_content"
        android:id="@+id/listView"
        android:layout_below="@+id/textView"
        android:layout_alignParentLeft="true"
        android:layout_alignParentStart="true" />

</RelativeLayout>


4. Add the code in the MainActivity.java to display the listview

To display the Animal’s name in the listview, add the following code to the  Main Activity.java

ArrayAdapter is used here as it is used to bind the arrays to the views. It acts like a bridge between them. It can be used with any subclass of the AdapterView , can be ListView or Spinner.

Animals is the java class we created in the beginning and animals is its object.

Make sure to use setAdapter as it is used to attach the ArrayAdapter to the listView.


ListView lv= (ListView) findViewById(R.id.listView);

        ArrayAdapter<Animals> animalsArrayAdapter= new ArrayAdapter<Animals>(this, android.R.layout.simple_list_item_1,Animals.animals);
        lv.setAdapter(animalsArrayAdapter);


If you will Run you app now, you will see the name of the Animals displayed in a listview.

5. Adding Clicks in the App for the listview

To create any action on clicks for the listview, we need to use OnItemClickListener and its onItemClick method.

When the name of the animal i.e the item in the listview would be clicked, onItemClick would start an Intent for another activity. Let’s call that activity as SecondActivity.java .

Add the following code in the onCreate method in MainActivity.java to add clicks.

Here we are using putExtra method to send the value “id” which will tell us that which item was clicked. This value is being sent to the SecondActivity by the name “ImageID”

lv.setOnItemClickListener(new AdapterView.OnItemClickListener()
        {
            @Override
            public void onItemClick(AdapterView<?> parent, View view, int position, long id) {
                Intent i= new Intent(MainActivity.this,SecondActivity.class);
                i.putExtra("ImageId",id);
                startActivity(i);
            }
        });


6. Create SecondActivity.java

Now if you will play the app, on clicking any animal name in the listview. you will be directed to an to SecondActivity which will show nothing at the moment.

screenshot_2016-02-02-00-14-20

Now to add the Image to the Second Activity’s layout. We need to have  an ImageView in the content_second.xml.

Here is the code of content_second.xml.

<?xml version="1.0" encoding="utf-8"?>
<RelativeLayout xmlns:android="http://schemas.android.com/apk/res/android"
    xmlns:app="http://schemas.android.com/apk/res-auto"
    xmlns:tools="http://schemas.android.com/tools"
    android:layout_width="match_parent"
    android:layout_height="match_parent"
    android:paddingBottom="@dimen/activity_vertical_margin"
    android:paddingLeft="@dimen/activity_horizontal_margin"
    android:paddingRight="@dimen/activity_horizontal_margin"
    android:paddingTop="@dimen/activity_vertical_margin"
    app:layout_behavior="@string/appbar_scrolling_view_behavior"
    tools:context="com.abhi.listview.listviewtutorial.SecondActivity"
    tools:showIn="@layout/activity_second">


    <ImageView
        android:layout_width="wrap_content"
        android:layout_height="wrap_content"
        android:id="@+id/imageView"

        android:layout_alignParentTop="true"
        android:layout_alignParentLeft="true"
        android:layout_alignParentStart="true" />
</RelativeLayout>


Add this code to the SecondActivity.java in the onCreate Method

Intent i=getIntent();
        int imageID= (int) i.getLongExtra("ImageId", 0);
        Animals animals= Animals.animals[imageID];

        ImageView imageView= (ImageView) findViewById(R.id.imageView);
        imageView.setImageResource(animals.getImageResourceID());

Here the “ImageId” is recovered back and used to get the Animal object from the array.

and then Image is shown in the imageView using setImageResource method.

Now run the app and you will see the desired output.


 DOWNLOAD COMPLETE PROJECT

Hope you like this tutorial and get a good understanding about ListView.


Remove Floating Action Button from the Blank Activity — January 31, 2016

Remove Floating Action Button from the Blank Activity

From the beginning of its days, Android has been changing a lot in its concepts.

In the recent time, one of the changes brought by the Material Design is the Floating Action Button. These can only be used with API 21 and above. But the appcompat support library v7 makes most of the Material Design supportable with the APIs before API 21.

1

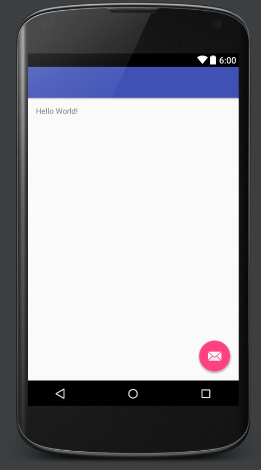
In the Android Studio, whenever I opt for a Blank Activity, this Floating Action Button also displays in the layout.

The Floating Action button can be removed from the app, if one does not want to use it. After all, this widget is also a part of Layout only.

To remove this widget, Remove the following code from the activity_main.xml file.

 <android.support.design.widget.FloatingActionButton  
 android:id="@+id/fab"  
 android:layout_width="wrap_content"  
 android:layout_height="wrap_content"  
 android:layout_gravity="bottom|end"  
 android:layout_margin="@dimen/fab_margin"  
 android:src="@android:drawable/ic_dialog_email" />  


Also delete the unnecessary code from the MainActivity.java

 FloatingActionButton fab = (FloatingActionButton) findViewById(R.id.fab);  
 fab.setOnClickListener(new View.OnClickListener() {  
   @Override  
   public void onClick(View view) {  
     Snackbar.make(view, "Replace with your own action", Snackbar.LENGTH_LONG)  
         .setAction("Action", null).show();  
   }  
 });  


Now you are good to go without the Floating Action Button. 🙂


Control Arduino using Bluetooth with Android App — June 10, 2015

Control Arduino using Bluetooth with Android App

Hello friends, Today we are going to learn about the integration of Bluetooth HC – 06 module with the Arduino Uno. Bluetooth Module HC-06 operates in SLAVE module only. That means it cannot initiate the Bluetooth connection with any other Bluetooth Device. There are other Modules also which can be used.Other popular Bluetooth Module is HC-05 and it operates in both MASTER/SLAVE mode therefore it can initiate the connection when in MASTER mode. In this tutorial,we will use Android App BlueTerm+ to turn off and on the LED on Arduino Uno using Bluetooth Module HC06.

Steps

1.Download the circuit diagram and Arduino sketch from here .       NOTE:- If it is mentioned 3.3V on your module, then do not connect the 5V,instead connect the 3.3V from the Arduino.My module works fine with 5V. 2.The link of the Android app used is https://play.google.com/store/apps/details?id=de.jentsch.blueterm 3.Watch the video

So this is how we can control arduino using bluetooth.Hope you guys like it. Let me know in comments if you like the video or if you have any doubts.:)

Get current location coordinates and city name in Android Application — May 14, 2015

Get current location coordinates and city name in Android Application

Hello friends,

In this blog post I am going to write about how to get the location coordinates in an android app and how to get the city name using those coordinates.

I have tried this app already and its working good.Please enable your gps settings and mobile data before using this app.

Here is the code

MainActivity.Java

1:  package devicelocation.abhi.com.newgetuserlocation;  
2:    
3:  import android.content.Context;  
4:  import android.location.Address;  
5:  import android.location.Criteria;  
6:  import android.location.Geocoder;  
7:  import android.location.Location;  
8:  import android.location.LocationManager;  
9:  import android.support.v7.app.ActionBarActivity;  
10:  import android.os.Bundle;  
11:  import android.util.Log;  
12:  import android.view.Menu;  
13:  import android.view.MenuItem;  
14:  import android.view.View;  
15:  import android.widget.Button;  
16:  import android.widget.TextView;  
17:  import android.widget.Toast;  
18:    
19:  import java.io.IOException;  
20:  import java.util.List;  
21:  import java.util.Locale;  
22:    
23:    
24:  public class MainActivity extends ActionBarActivity {  
25:    
26:    
27:    String cityname;  
28:    
29:    TextView latTextView;  
30:    TextView longTextView;  
31:    TextView locTextView;  
32:    @Override  
33:    protected void onCreate(Bundle savedInstanceState) {  
34:      super.onCreate(savedInstanceState);  
35:      setContentView(R.layout.activity_main);  
36:      latTextView=(TextView)findViewById(R.id.LattextView);  
37:      longTextView=(TextView)findViewById(R.id.LongtextView);  
38:      locTextView=(TextView)findViewById(R.id.LocationtextView);  
39:    
40:    
41:      //TO get the location,manifest file is added with 2 permissions  
42:      //Location Manager is used to figure out which location provider needs to be used.  
43:      LocationManager locationManager=(LocationManager)getSystemService(LOCATION_SERVICE);  
44:    
45:    
46:      //Best location provider is decided by the criteria  
47:      Criteria criteria=new Criteria();  
48:      //location manager will take the best location from the criteria  
49:      locationManager.getBestProvider(criteria, true);  
50:    
51:      //nce you know the name of the LocationProvider, you can call getLastKnownPosition() to find out where you were recently.  
52:      Location location=locationManager.getLastKnownLocation(locationManager.getBestProvider(criteria,true));  
53:    
54:      Geocoder gcd=new Geocoder(getBaseContext(), Locale.getDefault());  
55:      latTextView.setText(String.valueOf(location.getLatitude()));  
56:      longTextView.setText(String.valueOf(location.getLongitude()));  
57:      Log.d("Tag","1");  
58:      List<Address> addresses;  
59:    
60:        try {  
61:          addresses=gcd.getFromLocation(location.getLatitude(),location.getLongitude(),1);  
62:          if(addresses.size()>0)  
63:    
64:          {  
65:            //while(locTextView.getText().toString()=="Location") {  
66:              cityname = addresses.get(0).getLocality().toString();  
67:              locTextView.setText(cityname);  
68:            // }  
69:          }  
70:    
71:        } catch (IOException e) {  
72:          e.printStackTrace();  
73:    
74:        }  
75:    
76:    
77:      }  
78:    
79:    
80:    
81:    
82:    @Override  
83:    public boolean onCreateOptionsMenu(Menu menu) {  
84:      // Inflate the menu; this adds items to the action bar if it is present.  
85:      getMenuInflater().inflate(R.menu.menu_main, menu);  
86:      return true;  
87:    }  
88:    
89:    @Override  
90:    public boolean onOptionsItemSelected(MenuItem item) {  
91:      // Handle action bar item clicks here. The action bar will  
92:      // automatically handle clicks on the Home/Up button, so long  
93:      // as you specify a parent activity in AndroidManifest.xml.  
94:      int id = item.getItemId();  
95:    
96:      //noinspection SimplifiableIfStatement  
97:      if (id == R.id.action_settings) {  
98:        return true;  
99:      }  
100:    
101:      return super.onOptionsItemSelected(item);  
102:    }  
103:  }  
104:    

activity_main.xml

1:  <LinearLayout xmlns:android="http://schemas.android.com/apk/res/android"  
2:    xmlns:tools="http://schemas.android.com/tools" android:layout_width="match_parent"  
3:    android:layout_height="match_parent" android:paddingLeft="@dimen/activity_horizontal_margin"  
4:    android:paddingRight="@dimen/activity_horizontal_margin"  
5:    android:paddingTop="@dimen/activity_vertical_margin"  
6:    android:paddingBottom="@dimen/activity_vertical_margin" tools:context=".MainActivity"  
7:    android:orientation="vertical"  
8:    android:weightSum="1">  
9:    
10:    <TextView  
11:      android:layout_width="match_parent"  
12:      android:layout_height="wrap_content"  
13:      android:textAppearance="?android:attr/textAppearanceLarge"  
14:      android:text="Large Text"  
15:      android:id="@+id/LattextView"  
16:    
17:      android:padding="20dp"/>  
18:    
19:    <TextView  
20:      android:layout_width="wrap_content"  
21:      android:layout_height="wrap_content"  
22:      android:textAppearance="?android:attr/textAppearanceLarge"  
23:      android:text="Large Text"  
24:      android:id="@+id/LongtextView"  
25:      android:padding="20dp"/>  
26:    
27:    <TextView  
28:      android:padding="20dp"  
29:      android:layout_width="match_parent"  
30:      android:layout_height="wrap_content"  
31:      android:textAppearance="?android:attr/textAppearanceLarge"  
32:      android:text="Location"  
33:      android:id="@+id/LocationtextView"  
34:      android:layout_centerVertical="true"  
35:      android:layout_alignParentLeft="true"  
36:      android:layout_alignParentStart="true" />  
37:    
38:    
39:    
40:  </LinearLayout>  
41:    

AndroidManifest.xml 

1:  <?xml version="1.0" encoding="utf-8"?>  
2:  <manifest xmlns:android="http://schemas.android.com/apk/res/android"  
3:    package="devicelocation.abhi.com.newgetuserlocation" >  
4:    
5:    <uses-permission android:name="android.permission.ACCESS_COARSE_LOCATION"/>  
6:    <uses-permission android:name="android.permission.ACCESS_FINE_LOCATION"/>  
7:    <application  
8:      android:allowBackup="true"  
9:      android:icon="@mipmap/ic_launcher"  
10:      android:label="@string/app_name"  
11:      android:theme="@style/AppTheme" >  
12:      <activity  
13:        android:name=".MainActivity"  
14:        android:label="@string/app_name" >  
15:        <intent-filter>  
16:          <action android:name="android.intent.action.MAIN" />  
17:    
18:          <category android:name="android.intent.category.LAUNCHER" />  
19:        </intent-filter>  
20:      </activity>  
21:    </application>  
22:    
23:  </manifest>  
24:    

You can also download the full source code here.

https://drive.google.com/file/d/0B2Y9-jpvsfOBYzRrdTNFSEpZbjA/view?usp=sharing

Cheers!

Please comment if you have any thoughts or any query related to the post.

Data Logger using ESP8266,Arduino and thingspeak.com — May 11, 2015

Data Logger using ESP8266,Arduino and thingspeak.com

Hello friends,in this project I am logging the data over Thingspeak.com by using arduino and esp8266. I am using 4 sensors whose values would be uploaded.

Steps

If you are new to my ESP8266,visit my previous blog here

I recommend watching video as it shows the major steps.

1. Download the zip file in the link below.. https://drive.google.com/file/d/0B2Y9-jpvsfOBRURNRVlONlVrQ2s/view?usp=sharing

2. Check the .jpg file in the zip folder and connect the circuit.

3. Upload esp_test.ino to the arduino and send commands as shown in the video and connect esp8266 to your network..

4. Open thingspeak_final.ino in the arduino IDE and change the apiKey to the Api Key you obtained from Thingspeak.com

1

5. I have used four sensors in the code and that’s why i added all the field values in the string getStr,If you have one sensor,keep only the one and delete the rest of them

. 2

6.Run the code and check on the Thingspeak.com,the data would be logged. Please comment if you have any doubt regrading it. 🙂

What is API (Application Programming Interface) ? — March 27, 2015

What is API (Application Programming Interface) ?

Hello friends,if you are a developer you must have heard about API or you must have seen it in any post on the internet regarding web development or software development.

So today I will introduce you to API which stands for Application Programming Interface.

Suppose you are making any app,software or any website,and you want to integrate Facebook in it.Well,that’s where you need Facebook API.

API for an application is the set of programming interaction and standards to access that application.

A good API makes it easy for the developer to interact with the application.
 

WHY TO USE API?

An API resembles to Software as a Service(SaaS).Developers don’t need to build everything from the scratch.They can just use the API for their work.

Using the API makes it easy,efficient and time reducing for developers.

Popular APIs

1.Google Map API

2.Amazon Product Advertising API

3.YouTube API

4.Facebook API

Hope it helped you in getting introduced to APIs

Thank You. 🙂

Electronics: Basics of RS232 Communication — March 20, 2015

Electronics: Basics of RS232 Communication

Since the beginning of the communication between different devices,different standards were developed to send the data.One of the standard is known as RS232 communication standard.An RS232 serial port was once an important part of the computer devices.It was used to connect the computers with modems,mouses etc.. But now it had been replaced by the USB serial port as USB is really fast in transmission compared with RS232. It is still widely used in Scientific instruments,industrial machines.We can use RS232 protocol to connect the microprocessor to the computer.

RS232 is an asynchronous serial communication protocol.Let’s see what is serial communication and asynchronous communication,

Serial Communication- In serial communication,the whole data unit ,for example 1 byte is transmitted as 1 bit at a time whereas in parallel communication, 1 byte is send at once. Therefore,serial communication requires one wire and hence useful in long range transmission whereas parallel requires multiple wires as it send data through different wires simultaneously and used in short range transmission.

Synchronization- While transmitting the data,it is really necessary to know that where the data starts from and where does it ends.

One way of knowing it is by using Clock for synchronization.In this ,a clock line is added to synchronize the communication.This method is used in communication protocols like as SPI, I2C.

The other way is to use a start and stop bit with the data.This method is used in UART(Universal Asynchronous Receiver Transmitter)

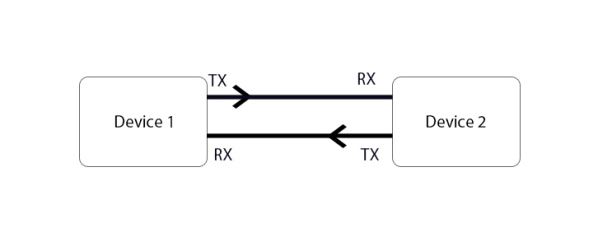
Untitled-4

Now,are you thinking that RS232 and UART are same??

No,there is difference between UART and RS232.

UART is responsible for sending and receiving the bits.At the output of UART,bits are represented in logic level voltages.These bits can become RS-232, RS-422, RS-485.

But RS232 specifies voltage levels i.e. HIGH=-12V and LOW =+12V

A microcontroller UART can not generate such voltages levels by itself. This is done with help of an additional component: RS-232 line driver. A classic example of an RS-232 line driver is MAX232.

As there is no synchronization used in RS232,the data is transmitted at several standard speeds.The speeds are measured in bits per second. Number of bits transmitted is  known as baud rate.

Some standard baud rates are

  • 1200
  • 2400
  • 4800
  • 9600
  • 19200
  • 38400
  • 57600
  • 115200

Hope this tutorial helps you in understanding the basic of RS232 communication.See you in the next tutorial. 🙂

C# Visual Studio: Show files of a folder in listbox using FolderBrowseDialog — March 14, 2015

C# Visual Studio: Show files of a folder in listbox using FolderBrowseDialog

Hello friends,have you ever tried to all the files of a folder into the listbox! Maybe someday you need to do that in case,you want to play the videos in media player,or if you want to change the files’ name etc.

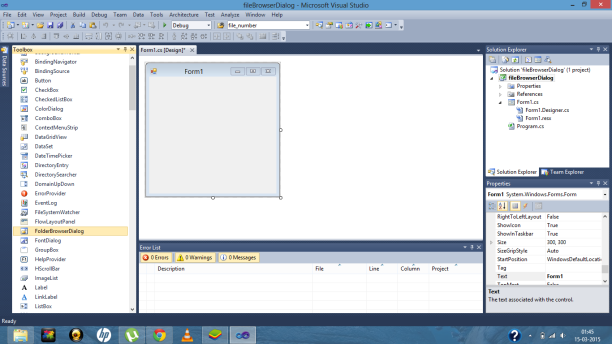
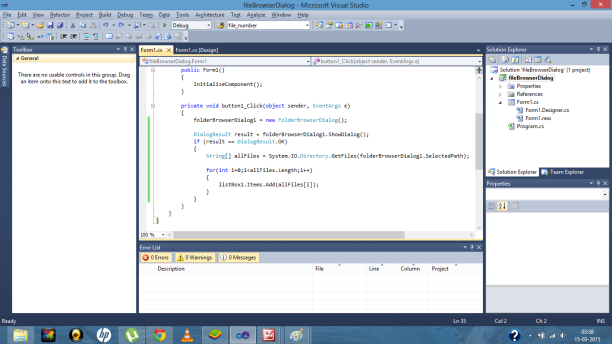
So,let’s see how to get started with it.1

– As you can see in the above image,the FolderBrowserDialog in the toolbox is highlighted.

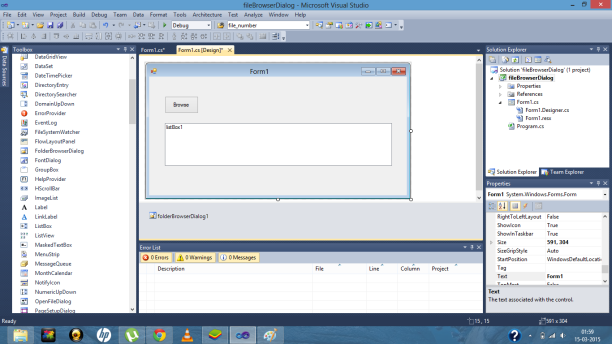
– Drag it on the form.

– Drag the Button and the ListBox.Change the name of the button(if you want to) and enlarge the ListBox.

6

-Now Double Click on the button,to go to the button’s click event.

-Now paste the following code into the button1_click event i.e. private void button1_Click(Object sender,EventArgs e){


folderBrowserDialog1 = new FolderBrowserDialog(); //to implement a new folder browser

DialogResult result = folderBrowserDialog1.ShowDialog();  
if (result == DialogResult.OK)                              
{
String[] allFiles = System.IO.Directory.GetFiles(folderBrowserDialog1.SelectedPath);  //store the files in the string array

for(int i=0;i
{
listBox1.Items.Add(allFiles[i]);         // use the for loop to continously add the file addresses to the listbox
}
}


Untitled-3

Output

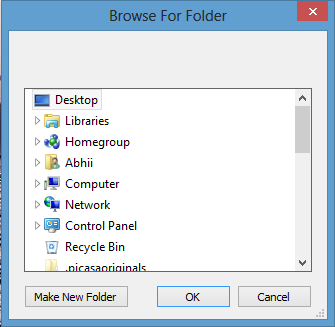
-Run the program and you will see the click on the Button and you will see the Dialog openes as shown in the image below.Select the folder and click OK.

Untitled

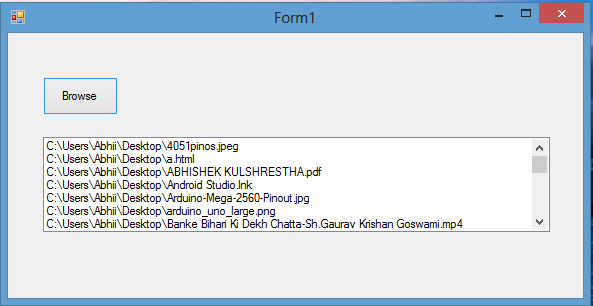
– You will see the file addresses added to the listbox as shown below.

Untitled-2

Arduino:How to find WiFi signal strength using ESP8266 — March 9, 2015

Arduino:How to find WiFi signal strength using ESP8266

Hello friends,have you ever thought about knowing the signal strength or the limit of your wifi network in your home?

You can do it easily with the help of ESP8266.If you do not know about ESP8266 Wifi module,view my previous blog Arduino:Getting started with ESP8266 WIFI module .

To buy ESP8266 from amazon, click here..

In the previous blog,we discussed about sending the AT commands to the ESP8266.The command AT+CWLAP can be used to find out the RSSI(Received signal strength indication).

The response of AT+CWLAP command is +CWLAP:<ecn>,<ssid>,<rssi>[,<mode>]

Untitled

Here the rssi block represents the signal strength.So,in the pic above,the strength in -35dBm

Arduino:Getting started with ESP8266 WiFi Module — March 8, 2015

Arduino:Getting started with ESP8266 WiFi Module

Do you want to connect your Arduino Board to the internet? Well you can,and even in a cheap and reliable way.You just have to use ESP8266 WiFi module with your Arduino. It is available for just 5$ or less than that. You can have your own ESP8266 module from the websites like Amazon and Ebay.

To buy ESP8266 from amazon, click here..
.

ESP8266 is a 3V device.It is just of 5$ but the power consumption is high.So we need to use 1 A current over here.For having the current of 1 A,we are using 1117 Voltage Regulator. In this tutorial,we will learn to send  AT commands to ESP8266 . Connect the circuit as shown in figure. Untitled-1

Paste the code in the Arduino Software.

 #include <SoftwareSerial.h>  
 SoftwareSerial esp8266(2,3); // make RX Arduino line is pin 2, make TX Arduino line is pin 3.  
                // This means that you need to connect the TX line from the esp to the Arduino's pin 2  
                // and the RX line from the esp to the Arduino's pin 3  
 void setup()  
 {  
  Serial.begin(9600);  
  esp8266.begin(9600); // your esp's baud rate might be different  
 }  
 void loop()  
 {  
  if(esp8266.available()) // check if the esp is sending a message   
  {  
   while(esp8266.available())  
   {  
    // The esp has data so display its output to the serial window   
    char c = esp8266.read(); // read the next character.  
    Serial.write(c);  
   }   
  }  
  if(Serial.available())  
  {  
   // the following delay is required because otherwise the arduino will read the first letter of the command but not the rest  
   // In other words without the delay if you use AT+RST, for example, the Arduino will read the letter A send it, then read the rest and send it  
   // but we want to send everything at the same time.  
   delay(1000);   
   String command="";  
   while(Serial.available()) // read the command character by character  
   {  
     // read one character  
    command+=(char)Serial.read();  
   }  
   esp8266.println(command); // send the read character to the esp8266  
  }  
 }  

Now upload the code and open Serial Monitor. Send the AT command “AT+RST”,the response will be OK. Send “AT+CWLAP” to show the available networks around ESP8266. SEND “AT+CWJAP=”SSID”,”PASSWORD”” to connect to any particular network. then “AT+CIFSR” to see the i.p address. This way we can test our WiFi module and use it to connect it to the network. Thank You 🙂